


Have you seen the resuable beeswax food wrappers? They have super cute designs on them, and come in various sizes to cover leftovers. The only problem…they cost an arm and a leg! For 3 individual wrappers it can be about $20 or more! And right now with the COVID-19 pandemic and grocery stores limited in supplies, and it being hard to go anywhere reusable products are going to be a big life-saver right now. In comparisson of how much you spend on plastic food wrappers that are NOT reusable, end up in the trash and landfills, and over a year can cost way more than $20. But 3 isn’t enough, and spending upwards of $100 or more up front is hard to chew, even though it’s a better option in the long run. I thought that I might try making them myself after doing some online research, and see how well they worked!
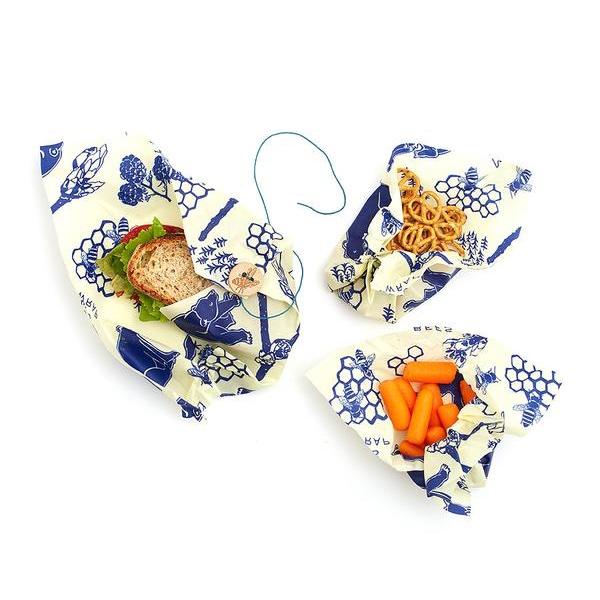

( ABOVE: *these are the Bees Wrap brand you can find in the store!
The buttons and string are a cute addition!)
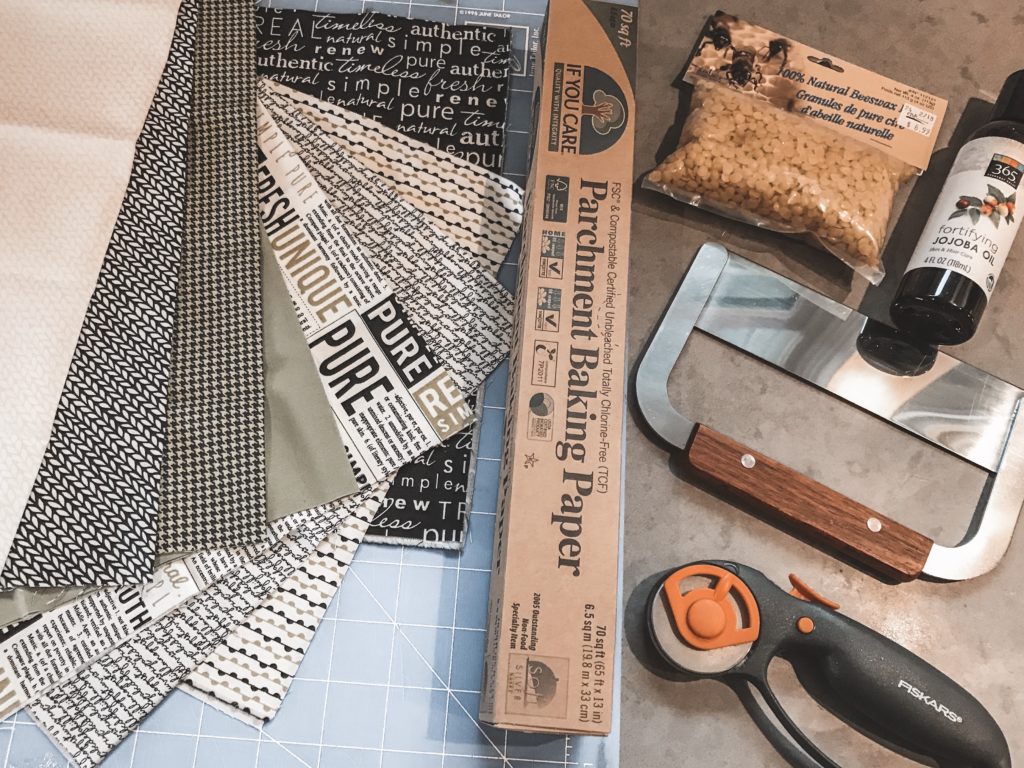
WHAT YOU’LL NEED:
Organic Beeswax Pellets
(I recommend white beeswax, though I didn’t use it in this tutorial. I noticed it avoids discoloring of the fabric which can have a yellowish tint with regular yellow beeswax, so it’s personal preference.)
Organic Jojoba Oil
Organic Cotton Fabric
To save time I purchased pre-cut bundles from my local fabric store. They come in different sizes, but it’s nice because it saves time, and also they pre-combine cute patterns together. They can run $20-$50 for a bundle, but you’re also getting LOTS of sheets of fabric. If you can find squares that have the pinking sheers edges, or if you have these kind of scissors that will help keep the edges from fraying through the process (which I didn’t think about until after 🙂
Scissors
Paint Brush
(larger/cheaper brushes that you won’t mind tossing after)
Parchment Paper
Iron
Old Towel
(Use one that you don’t care about salvaging – it will get ruined.)
OPTIONAL:
Rotary Cutter & Ruler
(if you didn’t purchase precut or if you want to adjust the sizes)
Pine/Tree Resin
(I didn’t use this in my recipe because I had read some mixed reviews about how it could be slighly toxic for you, even though you’re not ingesting it. This is the product that does make it extra tacky, but I chose to avoid it, just in case. It’s also what is in the store versions of these wrappers, FYI).
Getting all the pieces together and prepping is the longest part, especially when its your first time. But I recommend doing this in your kitchen on a non pourus serface.
REMEMBER: The wax will harden when not hot and it is REALLY hard to get off of some surfaces, including bowls, pans, fabric, countertops (not impossible just takes extra elbow grease!).
There are a couple ways to do this…this way isn’t the least messy by any means. But it did allow for a complete coverage of the wax mixture on the fabric. I’ll describe both ways to do this, and you can choose what works best for you.
OPTION 1 :
Melt Beeswax Mixture into Saucepan, Paint/Dip Fabric and Iron to Set Method
STEP 1:
Layout your towel, fabrics, paint brush, iron and parchment paper in one larger area of your countertop. In a sauce pan put in some water and bring to a semi-boil on med to high heat. Similar to how you melt chocolate you’ll want a glass mixing bowl that can fit on top of your sauce pan, this is where you will put your bees wax mixture and allow it to melt and stay hot. Turn on your iron and let it get hot while you do the rest of the steps.
STEP 2:
In your glass bowl sitting on your boiling water in the saucepan, combine 2:1 Ratio of Beeswax to Jojoba Oil. I used about 2 cups of beeswax to 1 Cup of Jojoba Oil. This doesnt have to be exact and may vary based on the different brands out there. Let it sit in the bowl and stir occasionally to evenly distrubute the heat and allow the beeswax & Jojoba Oil to melt into a combined liquid.
STEP 3:
On top of your old towel, place a sheet of parchment paper, and then lay on 1-2 pieces of fabric. Using your paintbrush you’ll quickly spread the mixture ontop of your piece of fabric, remember wax dries fairly quickly once in normal temperatures so you’ll need to move quickly. HOWEVER…if it dries on you don’t worry…just keep working what you can and I have a trick later in the process that will allow you to move the wax around after you apply it.
DIFFERENT WAYS TO APPLY WAX MIXTURE:
I tried 2 ways to get the mixture onto the fabric…I feel like painting was the slowest, but most consistent to get it evenly spread across the fabric. Dipping the fabric into the glass bowl works well too, however you can run out of mixture faster as it doesnt take much to make each wrap, and you’ll find it runs out faster and you may still need to spread it out with your paint brush.
STEP 4:
Once you have a decent amount of mixture on your fabric, take another piece of parchment paper and place it on top of your fabric, creating a sandwich of parchment, fabric and parchment. Take your hot iron and place it on top of your parchment and slowly and firmly push the wax around to cover the rest of the fabric. This will not only help set the wax further into the fibers of the fabric but will allow you to push the wax mixture around and fill in any of the gaps that you may not have missed when painting/dipping your fabric. With the parchment paper you’ll be able to easily see the wax move around. This part is a little slow, but it works REALLY well.
STEP 5:
Once the mixture is evenly spread throughout the fabric, remove it from the parchment paper. While holding 2 of the corners of your fabric gently wave it to help dry it out and then lay it onto a flat surface – like a cookie rack, this will allow it to dry fully.
STEP 6:
Repeat steps 3 through 5 until your finished with all the fabric you want to use. You may also need to remake your beeswax mixture if you run out, which will only take a few minutes.
IMPORTANT: Keep an eye out on your water level in your saucepan and you may need to add to it as it will evaporate over time.
STEP 7:
Once your pieces of fabric are dried (wait about 12- 24 hours) You’ll want to take your wraps and rinse them under cool water with soap. Then they are ready to go!
PRO-TIP: If you didn’t use the Pine Resin, like me, I recommend to help with the tackyness to crumble the fabric once its dried and create a little texture in it before rinsing. This will just help it have a more tactile feel and make it easier to stick to itself.
NOTE: The wraps stick pretty well to itself, however you may find you’ll still need a rubber band or string to keep it sealed, especially if you use the wraps to cover a bowl. You can sew on a couple cute buttons and add waxed twine to help you tie them around things like sandwiches, fruits or cheeses. You can also sew the wrappers into cute sandwich bags (which I plan to do in a future tutorial).
OPTION 2 :
Sprinkle Beeswax Mixture Raw onto Fabric, Bake in Oven then Paint Mixture While Hot to Set Method
STEP 1:
Preheat oven to 350º. Take a couple baking pans and layout 1-2 pieces of parchment paper onto the baking pans. Place your fabric on top of the pans, you may only be able to fit one on a pan and thats fine.
STEP 2:
Sprinkle your beeswax all over the fabric. You’ll want it mostly covered all the way to the edges, where you barely see the fabric beneath. This will make sure that as the wax melts in the oven you’ll get maximum coverage.
STEP 3:
Using spray bottle you’ll want to spray jojoba oil on top of the beeswax to get an even spread of this throughout your wrap, 3-4 sprays should be plenty per wrap.
STEP 4:
Place in the oven. DO NOT WALK AWAY. These only need to be in the oven for a few minutes, so you’ll want to keep an eye on them and take them out once you see that the beeswax has melted completely into the fabric. At about 5 min or so you should be able to take them out.
STEP 5:
If necessary you can use your paint brush to move the wax around and make sure that its evenly spread and coats the entire wrap. Once covered you can take the wraps off the pans and place them onto a cookie rack or some dry parchment paper to let it dry. This is so you can let them dry and continue to make more with the same pans you were using before. Repeat steps 1-5 until you’re done.
STEP 6:
Rinse off with cool water and soap in the sink and they are ready to use!
The thing I love about this project is it’s fun to do – but also helps you eliminate waste. These wrappers are reusable up to about a year, and only require rinsing with some cool water and soap to clean. You can also cut them up and throw them in your compost as long as you use 100% organic cotton! So not only are you making something thats useful for your home, even a great gift for others, but something thats good on the environment! I’m totally down for that!
**An even better option right now w/the issues with finding supplies needed during COVID-19 lockdown.

I’m Devan, a mom of 3, a wife, a full-time working mom, business owner, PTA parent, and hyperfixation extrodinare (thanks ADHD).
On my blog you’ll blog posts about DIY crafting, home projects, celebrations, and of course a few recipes. I believe in always learning and growing, and most importantly quality time with friends, family and especially some self care.


comments
Be the first to leave a comment